| Scale | Stitches per square | A typical URL QR code (~29 squares wide at 1×) | Finished size on 14-count Aida | Approximate stitch count |
|---|---|---|---|---|
| 1× | 1×1 | 29 stitches wide | ~5.3 cm (2.1 in) | ~840 |
| 2× | 2×2 | 58 stitches wide | ~10.5 cm (4.1 in) | ~3,360 |
| 3× | 3×3 | 87 stitches wide | ~15.8 cm (6.2 in) | ~7,570 |
| 4× | 4×4 | 116 stitches wide | ~21.0 cm (8.3 in) | ~13,450 |
QR code to cross stitch pattern
Encode a URL or short message as a stitchable QR code. Preview with realistic threads, adjust stitch scale (1×–4× stitches per square), map colors to your floss brand, then open in the editor or export PDF. The same two-color chart works for embroidery and C2C crochet.
Loading thread library…
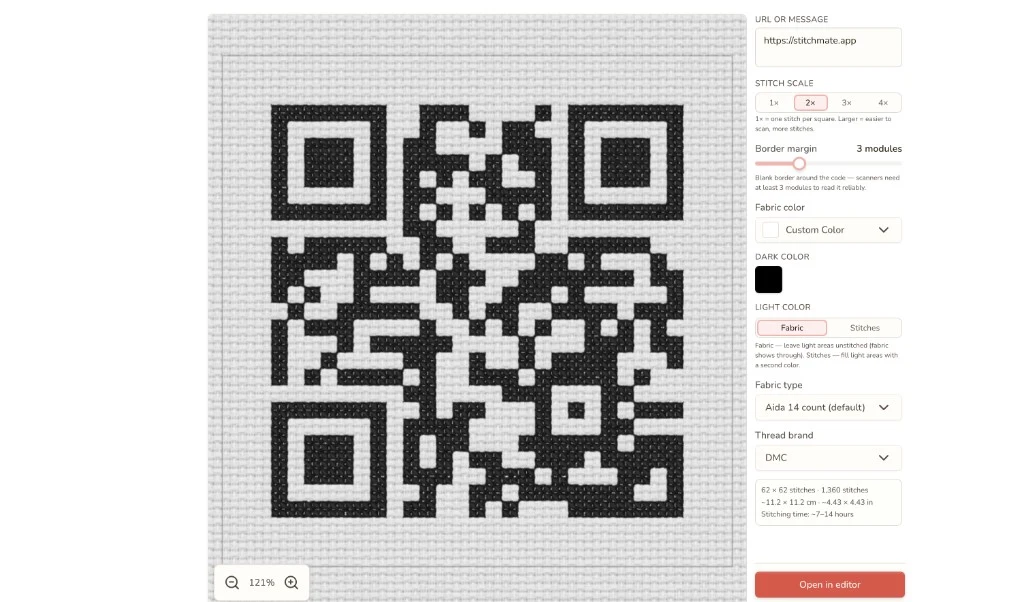
Turn a URL or short text into a cross stitch QR code you can stitch and scan. The tool builds a grid of crosses in two thread colors, shows the finished size on your chosen fabric count, and estimates stitching time based on stitch count. Because the output is a plain two-color grid, the same chart works as an embroidered QR code, a C2C crochet QR code, or a color map for knitting — the craft-by-craft section below covers what changes for each.
What you get
- Realistic preview — pan and zoom (Ctrl/Cmd + scroll) to see how the QR code reads in thread
- Stitch scale — 1× to 4× stitches per QR square, so you can balance finished size against ease of stitching
- Fabric and thread — set fabric color and count for accurate finished dimensions; pick QR dark/light colors and map them to your preferred floss brand
- Open in editor — load the pattern into the Stitchmate editor to adjust the palette, add text, or surround the code with a decorative border
- Export PDF — export a print-ready chart with symbols and thread legend
How to use this tool
Type or paste your content — a URL, Wi-Fi credentials, or a short message — and the QR code generates instantly. Adjust stitch scale to control the finished size: 1× produces the smallest pattern, 4× produces the largest with the most stitches per square.
Pick your dark and light thread colors, choose a thread brand to map them to (the tool covers 50+ brands), and set your fabric count to see the finished dimensions. The realistic preview updates in real time as you change settings.
When you're happy with the preview, either open it in the editor for further customization or export directly to PDF.
Why stitch a QR code?
Wi-Fi password frame. The most popular use — and genuinely practical. Stitch your network name and password as a QR code, frame it, hang it near your router. Guests scan instead of asking you to spell out xK7$mP2q for the fourth time.
Shop or portfolio link. Pattern sellers on Etsy, designers with a portfolio site, or anyone with a URL they share often. A stitched QR code on a business card, tote bag, or gift tag is a conversation starter that actually works.
Event keepsakes. Encode the URL of a wedding photo album, a baby announcement page, or a memorial tribute. The finished piece links the physical object to the digital content — scan it years later and the memory is right there.
The Rick Roll. Yes, people do this. A framed QR code that sends unsuspecting scanners to a certain music video is a modern classic. The stitching makes it even better — nobody expects a cross stitch to prank them.
Gifts with a hidden message. Encode a personal note, a poem, or coordinates of a meaningful location. The recipient scans to discover the message — a layer of interaction that a printed card can't match.
Choosing the right scale
Each square in the QR grid — one cell of the code — becomes a block of stitches. Stitch scale sets how many stitches fill each square, which directly affects the finished size and stitching time.
For scanning reliability: 2× or 3× is the sweet spot. At 1×, each square is a single stitch — any tension inconsistency or slight color bleed between stitches can make scanning difficult. At 2× and above, each square is a solid block that reads cleanly from a phone camera.
For gifts and display: 3× or 4× gives a finished piece large enough to frame or mount. The stitching time is still manageable — a 3× QR code on 14-count Aida takes roughly 40–75 hours depending on your pace.
For small projects (bookmarks, patches, tags): 1× keeps the pattern compact. Use 18-count Aida or higher for a cleaner result at this scale.
Use the fabric calculator to check exact dimensions for your specific pattern size and fabric count.
Tips for a scannable result
QR codes are designed with built-in error correction — they can tolerate some damage and still scan. But stitched codes have specific challenges that printed codes don't. Here's how to keep yours scannable.
High contrast is non-negotiable. Black thread on white fabric is the gold standard. Dark navy on white, black on cream, or dark brown on ecru all work. Avoid mid-tones, pastels, or dark-on-dark combinations — phone cameras need a clear difference between light and dark squares to read the code.
The quiet zone matters. Every QR code needs a border of empty space (at least four squares wide on each side). The tool includes this automatically. Don't stitch a decorative border that butts right up against the code — leave that blank margin intact, or scanners may not recognize where the code starts.
Accuracy counts. One missed stitch or one extra stitch can break the code. QR error correction handles minor imperfections, but a whole row shifted by one square will not scan. Count carefully, mark your progress, and double-check against the chart as you go.
Test before you commit. Scan the on-screen preview with your phone camera before you start stitching. If the preview scans, the finished piece will too — as long as you stitch it accurately and maintain contrast.
Keep stitches even. Consistent tension keeps each square reading as a square. If some stitches are tight and others loose, the grid distorts — and distorted squares confuse scanners. This matters more at 1× scale than at 3× or 4×, where the larger blocks are more forgiving.
Consider your fabric. 14-count Aida is the most practical choice for QR codes — the grid is clear, stitches are square, and the holes are easy to see. Evenweave works too but offers no advantage here. Avoid very low counts (11-count) at 1× scale — the stitches may be too large and loose to scan reliably.
Embroidered, knitted, and crochet QR codes
A QR code is a grid of dark and light squares. This tool charts it for cross stitch, but the chart itself is craft-agnostic — any technique that can put a solid block of one color on a grid can reproduce it. What changes between crafts is whether the squares stay square, and that decides whether a phone will read the result.
Embroidered QR codes
Yes, it is possible to embroider a QR code — a cross stitch QR code already is one, since cross stitch is counted embroidery. If you'd rather not work in crosses, two other approaches use the same chart:
- Satin-stitch blocks on evenweave or linen. Work each dark square as a small filled block over the same number of fabric threads in both directions. Over two threads of 28-count, each block is about 1.8 mm — the same size as a stitch on 14-count Aida. Keep the block edges crisp: scanners read edges, not centers.
- Machine embroidery. Digitize each dark square as a filled square of 2–3 mm and stitch onto stabilized fabric — this is how commercial QR patches are made. Allow for pull compensation, because satin fills shrink across the stitch direction and squares digitized at exactly the target size come out narrow.
What doesn't work: rounded surface stitches such as French knots or seed stitch for the data squares. Uneven, soft-edged squares blur the boundaries a camera needs. Pay particular attention to the three large nested squares in the corners — the finder patterns — because those are what the phone locks onto first.
Knitted QR codes
Knitting is the tricky one, and the reason is geometry: a knit stitch is not square. In stockinette a stitch is wider than it is tall — a typical worsted gauge of 20 stitches and 28 rows per 4 in gives a stitch about 5 mm wide and 3.6 mm tall. Chart a QR code one stitch per square and the finished code comes out roughly 30% shorter than it is wide. Scanners tolerate a little distortion; they don't tolerate that.
Two ways around it:
- Compensate in the chart. Knit each QR square as a block of stitches that comes out square at your gauge — for the gauge above, 5 stitches × 7 rows. The code gets big fast, and you have to count the quiet zone in: a 29-square URL code plus its four-square quiet zone on each side is 37 squares across, so at 5 stitches per square that's 185 stitches wide — about 37 in (94 cm) at 5 stitches per inch. That's blanket or wall-hanging territory, which is where most knitted QR codes live.
- Change the stitch. Garter stitch and linen stitch have gauges much closer to square, so a QR code in garter intarsia — or worked in duplicate stitch over a garter background — keeps its proportions without the 5 × 7 blow-up. Swatch first and measure; if a 10 × 10 square block comes out within a couple of millimeters of square, you're fine.
Stitchmate does not have a knitting mode. What you get from this tool is a two-color grid with exact square counts, which is what a knitting color chart is — use it as the color map and apply your own gauge — knitter's graph paper draws the grid at your gauge so you can check the proportions before you cast on. Before committing to the whole thing, knit one finder pattern (the 7 × 7 nested square) as a swatch and check with a ruler that it's as tall as it is wide.
Crochet QR codes
Crochet is the friendliest of the three. A C2C (corner-to-corner) block — a chain-3 plus three double crochets — is a small square of fabric, so a QR code maps onto a C2C graphghan one square per block with no distortion at all. Count the quiet zone into the width: a 29-square code plus its four-square quiet zone on each side is 37 blocks wide, roughly 28 in (71 cm) in worsted yarn on a 5 mm hook: a cushion front or a small blanket panel. Two colors and no shading make it about the cleanest color-change practice a first graphghan can offer.
Single crochet (tapestry crochet) works too. Single crochet stitches are close to square but usually a little wider than tall — check your gauge and, if the code is coming out short, add an extra row every five or six.
The workflow is direct: generate the QR code here, then open it in the editor's C2C crochet mode, which turns the grid straight into row-by-row written instructions and per-color block counts — no exporting or re-importing an image. For a single-crochet (tapestry) graph instead, use the crochet pattern maker. In every craft, keep the four-square quiet zone around the code in the background color.
Related tools
- Knitter's graph paper — chart the code at your gauge so the modules stay square
- Fabric calculator — check finished dimensions for any stitch count and fabric count
- Time calculator — estimate stitching hours based on pattern size and complexity
- DMC color chart — browse thread colors for your QR code palette
- Photo to cross stitch pattern — convert photos into full-color patterns
- Cross stitch text generator — turn names, quotes, and labels into stitchable charts
- C2C crochet pattern maker — turn the QR grid into a corner-to-corner graphghan with written rows
- Crochet pattern maker — single-crochet graphs for tapestry-crochet QR codes
Further reading
- Popular Science: Why you should cross stitch a QR code — overview of the trend with practical tips
- Hailey Stitches: How to cross stitch a QR code — step-by-step tutorial with 10 use case ideas
- Instructables: QR code cross stitch patch — turning a stitched QR into a wearable patch
Generate your QR pattern above, or open the editor to design something from scratch →
FAQ
What can I encode in the QR pattern?
Any text the QR standard supports — most often a short URL (your shop, portfolio, or a specific page), Wi-Fi setup strings, or a brief message. Longer payloads produce larger QR grids, which means more stitches. A short URL like stitchmate.app produces a compact code; a 200-character message produces a noticeably larger one.
What does 1× to 4× scale mean?
Each square in the QR grid becomes a block of stitches: 1× means one stitch per square, 2× means a 2×2 block (four stitches per square), 3× means a 3×3 block, and so on. Larger scale makes the code easier to stitch and more reliable to scan, but the finished piece is bigger. See the scale table in the article above for specific sizes.
Will my stitched QR code actually scan?
Yes — if you maintain high contrast between the dark and light colors, keep stitches even, and don't skip or add stitches. QR codes have built-in error correction that tolerates minor imperfections. Test by scanning the on-screen preview with your phone before you start stitching.
Are my files uploaded to a server?
No. QR generation and the realistic preview run entirely in your browser. Nothing leaves your device.
Can I print or export the pattern?
Yes — use Export PDF to open the export flow with a print-ready chart, or Open in editor to adjust colors, add text, or modify symbols in the full Stitchmate editor before exporting.
How accurate is the stitching time estimate?
The range uses the same formula as Stitchmate's import tools: roughly 100–200 full crosses per hour, depending on experience and the number of color changes. QR patterns use only two colors, so they stitch faster than multi-color designs. Your actual pace will vary — use the time calculator for a more detailed estimate.
What's the best color combination for a scannable QR code?
Black thread on white fabric is the most reliable. Any high-contrast dark/light pairing works — dark navy on white, black on cream, very dark brown on ecru. Avoid pastels, mid-tones, or dark-on-dark combinations. If you want colored QR codes, keep the value contrast high: the dark color should be genuinely dark and the light color genuinely light.
Is it possible to embroider a QR code?
Yes. A cross stitch QR code is already embroidery — cross stitch is counted embroidery — and it scans as long as the squares stay square and the contrast stays high. You can also work each dark square as a small satin-stitch block on evenweave, or digitize the chart for machine embroidery, which is how commercial QR patches are made. Avoid rounded surface stitches such as French knots for the data squares: blurred edges are what stop a camera reading the code.
Can you knit a QR code?
Yes, with one catch: knit stitches are wider than they are tall, so a code knitted one stitch per square comes out squashed and may not scan. Either knit each QR square as a block of stitches that comes out square at your gauge (for example 5 stitches × 7 rows in stockinette), or use a squarer-gauge stitch such as garter. Stitchmate does not have a knitting mode — use the two-color chart from this tool as the color map and apply your own gauge.
Can you crochet a QR code?
Yes, and corner-to-corner (C2C) crochet is the easiest craft of all for it: each C2C block is a small square, so the code maps one square per block with no distortion. Generate the QR here, then use the C2C crochet pattern maker for row-by-row written instructions and block counts. Single crochet (tapestry crochet) also works; check your gauge, since single crochet stitches are usually a little wider than tall.
See how your photo converts
Cross stitch is a real commitment — real thread, real hours, real frustration if the pattern doesn't work. Stitchmate lets you see exactly what you're getting into before you buy the first skein.
Upload an image, adjust the settings, check the FLOW Score — about 30 seconds to know if it'll work. Everything up to PDF export is free, no account needed.
Upload Your Photo Free