How to Fix Cross Stitch Mistakes (Without Losing Your Mind)
You almost certainly don't need to start over. Most cross stitch mistakes are fixable, many are barely noticeable, and some aren't worth fixing at all. Here's how to tell the difference.
Quick answer: Most cross stitch mistakes don't need to be fixed — and when they do, you have five options from simple unpicking to creative redesign. The 10-foot rule is your best friend: if you can't see it from across the room, it's probably not worth fixing.
You've been stitching happily for hours — maybe days — and then you see it. A stitch in the wrong place. A color that doesn't match. A whole section that's drifted off by one square.
Here's the most important thing to know: you almost certainly don't need to start over. Most cross stitch mistakes are fixable, many are barely noticeable in the finished piece, and some aren't worth fixing at all.
This guide covers how to assess what went wrong, when to fix it, when to leave it, and — just as importantly — how to stop mistakes happening in the first place.
First: stop and breathe
Before you reach for the scissors or start pulling threads, pause. The worst damage usually happens in the panic after discovering a mistake, not from the mistake itself.
Put the needle down. Step back from your work. Make a cup of tea if that's your thing. Then come back and assess calmly.
Pulling threads in frustration can enlarge holes in your fabric, snap floss, and turn a small fix into a much bigger one.
The 10-foot rule
Here's a question that saves hours of unnecessary frogging: can you see the mistake from across the room?
Hold your work at arm's length — or better yet, hang it where you'd display it and step back. If the mistake disappears at normal viewing distance, it probably isn't worth fixing.
This sounds like permission to be sloppy. It isn't. It's permission to be practical. Nobody examines a framed cross stitch piece stitch by stitch. They see the whole image. A single misplaced stitch in a field of green? Invisible. A color one shade off in a busy area? Nobody will ever know but you.
When to fix it (and when to leave it)
Not all mistakes are equal. Here's a quick decision framework:
Fix it now if:
- The mistake changes the shape or outline of the design
- It creates a visible color block in the wrong place
- You're still working nearby and only need to undo a few stitches
- The error will compound — meaning future sections won't line up if you keep going
- It's a piece you're selling or gifting to someone particular
Seriously consider leaving it if:
- It fails the 10-foot rule (invisible from normal viewing distance)
- It's in a busy area with lots of color changes or texture
- Fixing it would mean undoing hours of work
- The "wrong" color is close to the "right" color
- It's a single confetti stitch in the background
There's no shame in leaving a small mistake. There's an old tradition across many crafts — sometimes called a "humility stitch" — of leaving a deliberate imperfection in handmade work. Whether you believe the story or not, the underlying idea holds: handmade means handmade. Your piece isn't a machine print. It's allowed to have a bit of life in it. If you ever need reassurance, browse r/CrossStitch — you'll find plenty of experienced stitchers who cheerfully leave small mistakes in their work.
If you've decided the mistake needs fixing, read on. If you've decided to leave it, skip ahead to prevention tips so the next one stings less.
The language of fixing mistakes
Before we get into techniques, a quick glossary — because the cross stitch community has its own vocabulary for this (see the full cross stitch glossary for more terms):
- Frogging — ripping out stitches to fix a mistake. Named because you "rip it, rip it" (ribbit, ribbit — like a frog). Used across cross stitch, knitting, and crochet.
- Unpicking — carefully removing stitches one at a time, usually with a needle or seam ripper. More controlled than frogging.
- Tinking — a knitting term (knit spelled backwards) that some cross stitchers have adopted. Means undoing stitch by stitch while the thread is still on the needle.
- UFO — an Un-Finished Object. The pile of abandoned projects most stitchers pretend doesn't exist.
- WIP — Work In Progress. What a UFO was before you gave up on it.
Method 1: unpick a few stitches
Best for: mistakes you catch quickly, within a few stitches of where you're currently working.
This is the simplest fix. You're essentially backing up stitch by stitch to the point where things went wrong.
How to do it:
- Keep your needle threaded — no need to cut the floss
- Slip the needle (blunt end first) under the last stitch you made
- Lift gently to loosen it, then pull the floss through
- Repeat stitch by stitch until you reach the mistake
- Continue stitching from the corrected position
Tips:
- Use a blunt tapestry needle, not a sharp one. A sharp needle can split your existing threads, making them harder to remove and potentially damaging them.
- Work slowly. This isn't a race. Each stitch should come out cleanly before you move to the next.
- If you're going back more than four or five stitches, it's often faster to unthread the needle and pull from the front instead.
Method 2: frog back to a safe point
Best for: miscounts that affect a larger area, color errors you didn't catch early, or sections where you've lost track of where you are.
Frogging means removing a bigger section of stitching — sometimes dozens or even hundreds of stitches.
How to do it:
- Identify the last point where you're completely confident everything is correct. Mark it on your pattern or take a photo.
- Remove the needle from your thread.
- Pull the floss out from the front, working from the most recent stitches backward.
- For larger sections, you can snip the top leg of each cross on the front with sharp embroidery scissors, then pull the loose threads out from the back. Curved-tip scissors make this easier.
- Use tweezers to remove any trapped thread fragments.
- Once you've reached the safe point, rethread with fresh floss and continue.
Tips:
- Pull gently. Yanking the floss can stretch the holes in your fabric. The holes will mostly recover after washing and pressing, but there's no need to make it worse.
- Trim the floss as you pull to keep it short. Long lengths tangle and knot as you remove them.
- Use fresh floss when you re-stitch. Frogged thread gets fuzzy and weakened — it won't look as crisp the second time around.
- Don't panic about stretched holes. They look alarming, but by the time you've finished the piece and washed it, the fabric relaxes and the holes shrink back. On Aida in particular, this is almost never visible in the finished work.
Method 3: stitch over the mistake
Best for: color errors where removing stitches would be more disruptive than covering them.
Sometimes the fastest fix is to stitch right over the wrong color with the right one.
How it works:
- Simply stitch the correct color on top of the existing wrong color, using the same holes.
- The area will be slightly thicker — two layers of thread instead of one — but in most cases this isn't noticeable.
When this works well:
- Darker over lighter — a dark color covers a lighter one with almost no visible difference
- Similar shades — if the wrong color is close to the right one, the overlap blends naturally
- Busy areas — in sections with lots of color changes, a slightly thicker stitch disappears among the texture
When it doesn't work as well:
- Lighter over darker — the dark thread can show through, especially on lower-count fabric
- Large solid areas — if you're covering a big block of wrong color, the bumpy texture becomes noticeable across a flat section
- Very light colors on high-count fabric — there simply isn't enough room in the hole for four layers of thread (two wrong, two right)
The tradeoff is honest: stitching over is faster but less perfect. For a piece you're displaying at home, it's usually fine. For a piece you're selling, you might want to frog and re-stitch instead.
Method 4: redesign around the mistake
Best for: old mistakes discovered late in a project, errors in organic areas like foliage or sky, situations where frogging would mean undoing weeks of work.
This is the creative option — and it's more common than you might think. Experienced stitchers do this regularly, and most designers are completely fine with it.
How it works:
- Leave the wrong stitches in place
- Adjust the surrounding area so the mistake blends into the design
- Add, remove, or shift a few stitches to make the pattern flow naturally around the error
This works especially well in:
- Nature scenes (trees, flowers, grass — organic shapes are forgiving)
- Background areas with scattered colors
- Geometric patterns where shifting one element doesn't break the overall symmetry
- Pieces with backstitch outlines that will define the shapes regardless of fill color
Method 5: the patch repair
Best for: extreme situations — damaged fabric, stains that won't come out, or errors so embedded that no amount of frogging will help.
This is a last resort, but it works surprisingly well:
- Carefully cut away the damaged section of fabric, leaving a margin around the stitched area
- Cut a matching piece of fabric slightly larger than the gap
- Place the new fabric behind the gap, aligning the weave
- Stitch through both layers to secure, then continue your pattern over the patch
The stitches themselves hide the repair. Once the area is fully covered, the patch is invisible.
When to actually start over
Starting over is almost never necessary. But there are a few situations where it's the practical choice:
- You've miscounted the center point and the entire design is off-center on the fabric, with not enough margin on one side
- You've used the wrong fabric count entirely (14-count instead of 18-count, for example)
- There are so many layered mistakes that you've lost track of what's correct and what isn't
- The fabric itself is damaged beyond a patch repair
If you do start over, don't see it as failure. You've practiced every stitch you're about to make again, and the second attempt will almost always look better than the first. Your hands know the pattern now.
And if the fabric is still usable after frogging, it absolutely can be re-used. Wash it to relax the fibers, press it with starch to restore some stiffness, and it's ready for a new project.
How to prevent mistakes
The best fix is the one you never need. Here are the habits that experienced stitchers swear by:
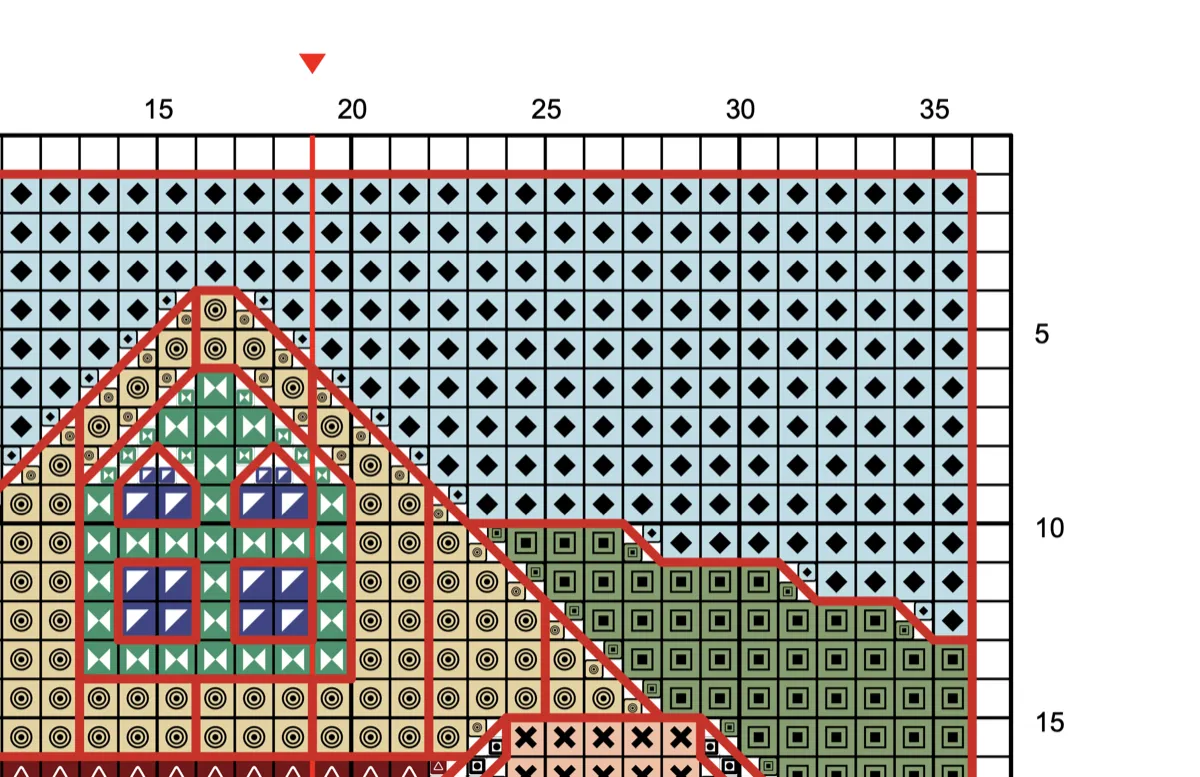
Grid your fabric
Marking your fabric into 10x10 squares — matching the gridlines on your chart — is the single most effective way to prevent miscounts. You can grid with:
- Water-soluble markers — wash out completely when you rinse the finished piece
- Fine fishing line — stitch it in temporarily and pull it out when done
- Sulky thread — a temporary thread designed for this purpose
Gridding takes 30-60 minutes on a medium-sized piece. It saves hours of frogging.
Organize your threads
Wrong-color mistakes happen most often when similar shades are jumbled together. A thread organizer — even a simple card with labeled holes — means you always grab the right color. For details on the different thread types and how to tell them apart, see our thread guide.
Label each thread with both its number and its chart symbol. When DMC 3371 and DMC 310 look identical under lamplight at 11pm, the label saves you. Browse all 489 DMC colors to compare similar shades side by side.
Mark your progress
As you stitch, mark off completed sections on your chart. If you're working from a paper pattern, use a highlighter. If you're working from a screen, use an app that lets you check off completed areas — this is exactly what Pattern Keeper is designed for. Our guide on how to read a cross stitch pattern covers chart navigation in detail.
Knowing exactly where you left off prevents the "where was I?" miscounts that happen after you put a project down for a few days (or weeks, or months — no judgment).
Use good lighting
More mistakes happen in poor lighting than in any other condition. Your eyes can't distinguish similar thread colors accurately under warm lamplight — DMC 3371 (black brown) and DMC 310 (black) look identical. DMC 3325 (light baby blue) and DMC 827 (very light blue) blur together.
Daylight-balanced lighting is ideal. If you stitch in the evening, a daylight LED lamp makes a noticeable difference. Some stitchers use magnifying lamps, which help with both color accuracy and counting on high-count fabric.
Count twice, stitch once
Before starting a new section, count from your last confirmed stitch to your starting point — then count again from a different direction. If both counts agree, you're in the right place.
This takes five seconds and prevents the kind of off-by-one errors that cascade through an entire section.
Know when to stop for the night
Late-night stitching is when most mistakes happen. If you catch yourself recounting the same section three times, or if the colors are starting to blur together, it's time to stop. The project will still be there tomorrow.
Put a needle in your last stitch so you know exactly where you left off.
How Stitchmate helps
A few of these problems start at the pattern stage, not the stitching stage — and that's where Stitchmate comes in.
Confetti cleanup. Scattered single stitches are a leading cause of miscounts and frustration. Stitchmate's confetti cleanup tools reduce isolated stitches during pattern creation, so you're working with cleaner, more stitchable designs from the start.
Color management. If a pattern has 45 colors and six of them are nearly identical dark blues, mistakes are inevitable. You can reduce colors in the editor while preserving the design, cutting down on thread confusion before you ever pick up a needle.
Clear PDF symbols. Misreading a chart is one of the most common mistake triggers. Stitchmate's PDF export uses distinct, high-contrast symbols that stay crisp even at small sizes — because you can't stitch accurately from a chart you can't read. Learn more in our guide on how to read a cross stitch pattern.
Digital pattern marking. Working from a screen means you can zoom in on tricky sections, and tracking your progress is easier than highlighting a paper chart you might need to reprint.
Design Cleaner Patterns
Reduce confetti, manage colors, and export crisp charts — so you spend less time frogging and more time stitching.
Open Pattern EditorFree to use. No account required.
FAQ
I made a mistake 200 stitches ago. Do I have to frog all 200?
Will frogging ruin my fabric?
Can I reuse thread I have frogged out?
Is it okay to stitch a darker color over a lighter one?
How do I fix a backstitch mistake?
My stitching tension is uneven. Can I fix this?
I spilled something on my WIP. Is it ruined?
Related Guides & Tools
What Is Confetti in Cross Stitch?
Scattered single stitches cause more mistakes than almost anything else. Learn what confetti is and how to reduce it.
How to Read a Cross Stitch Pattern
Understanding your chart correctly is the best way to prevent mistakes in the first place.
Backstitch in Cross Stitch
How to fix backstitch mistakes and when backstitch outlines can hide fill errors.
How Many Colors Should a Pattern Have?
Fewer similar colors means fewer wrong-color mistakes. Find the right balance.

What is Aida Count?
How fabric count affects stitch visibility, hole size, and how easy it is to spot and fix errors.
How Long Does Cross Stitch Take?
Factor in frogging time when planning your project — realistic estimates by size and skill level.