How to read a cross stitch pattern
If you've ever unfolded a cross stitch chart and thought "this looks like a spreadsheet designed by someone who hates me" — you're not alone. Here's how to read any pattern from any designer.
Cross stitch patterns can look intimidating, especially large ones spread across multiple pages. But they're actually straightforward once you know what you're looking at.
A cross stitch pattern is a grid where each square represents one stitch. Symbols inside the squares tell you which thread color to use. A key (also called a legend) maps each symbol to a specific thread code — usually DMC or Anchor. Stitched Modern has a good visual summary of this concept if you want a quick reference alongside this guide.
That's the entire concept. Everything else is just details about how different designers present that information — and those details are what this guide is for.
The anatomy of a cross stitch pattern
Every pattern, whether it's a $2 Etsy download or a chart you created yourself, shares the same core elements. Once you can identify these five parts, you can read any pattern from any designer.
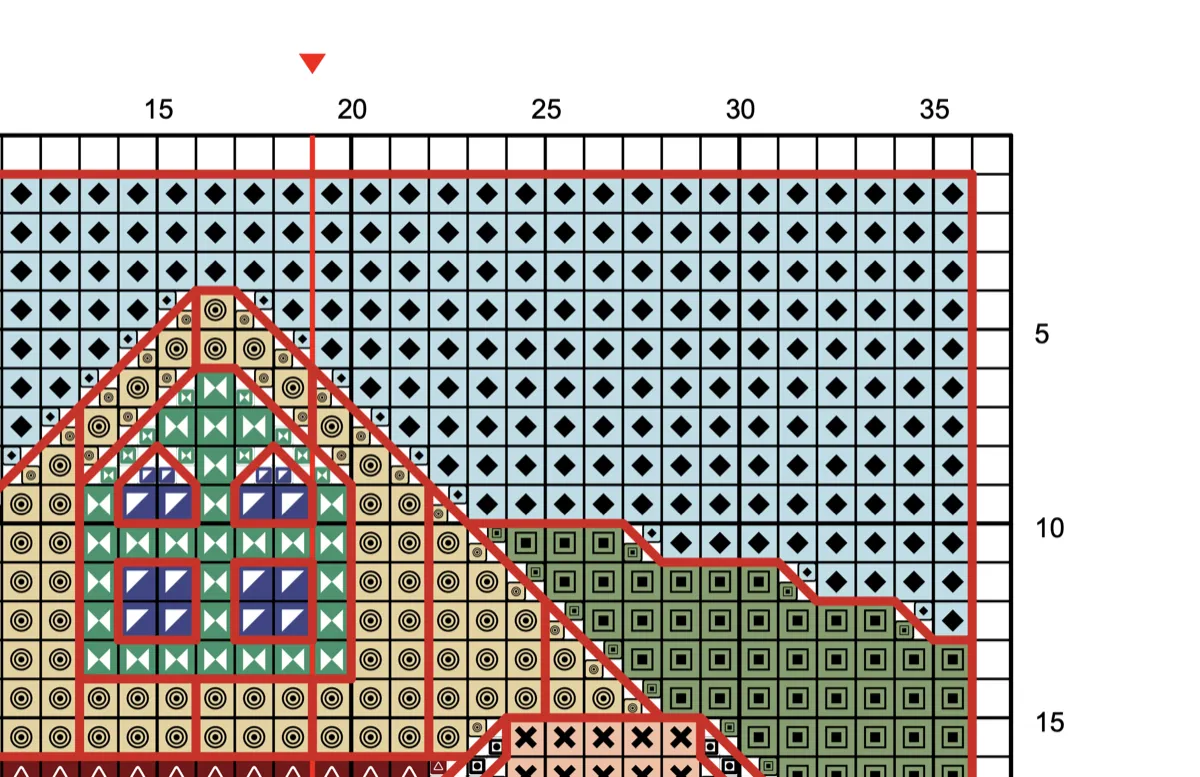
The grid
The main chart is a grid of squares. Each square = one cross stitch on your fabric. Bold lines divide the grid into 10×10 sections — and these sections are your best friend.
Those 10×10 blocks are more important than they look. They're how you avoid the most common and most painful mistake in cross stitch: miscounting. When you're working across a row, count in blocks of ten rather than individual stitches. Many stitchers mark 10×10 gridlines directly onto their fabric with a washable pen or basting thread — it takes 20 minutes of prep and saves hours of frogging later.
(If you haven't heard the term before: frogging means ripping out stitches to redo them. "Rip it, rip it" — ribbit. The cross stitch community has a sense of humor about its frustrations.)
Row and column numbers run along the edges of the chart. Use them as coordinates — "row 45, column 80" tells you exactly where a stitch belongs. This is especially useful when you're checking your work or picking up a WIP after a break.
The key (legend)
The key is where the pattern becomes readable. It lists every symbol used in the chart alongside the thread color it represents: the brand (DMC, Anchor, Cosmo, Madeira, and others), the color code, the color name, and sometimes the number of strands to use.
Three things to know about keys:
Symbols are not universal. A circle might mean DMC 310 (black) in one pattern and DMC 321 (red) in another. Always check the key for each new pattern — never assume a symbol means the same thing as your last project. This catches out experienced stitchers too, not just beginners.
Strand count matters. Most cross stitch uses two strands of floss on 14-count Aida. Backstitch typically uses one strand. If the pattern doesn't specify, those are safe defaults. But some designers call for three strands on 11-count or one strand on 18-count — always check before you start.
Thread quantity is worth knowing upfront. Better patterns include a thread usage summary — how many skeins of each color you'll need. If yours doesn't, a thread calculator can save you a trip back to the store mid-project. Running out of DMC 310 on a full coverage piece with 3,000 black stitches remaining is... not ideal.
Center marks
Arrows along the top and side edges of the chart mark the center of the design. These are your alignment reference — fold your fabric in half both ways, mark the intersection, and match it to the center arrows on the chart.
Starting from the center ensures your design ends up properly positioned on the fabric. Start from a corner and you risk running out of fabric on one side. It happens more than anyone likes to admit.
Stitch count and finished size
The pattern states its dimensions in stitches — for example, 140 × 200. This tells you the design size, but not the finished size on your fabric. That depends on your fabric count.
The calculation: stitch count ÷ fabric count = finished size in inches.
A 140-stitch-wide pattern on 14-count Aida: 140 ÷ 14 = 10 inches wide. The same pattern on 18-count Aida: 140 ÷ 18 = 7.8 inches wide.
Always add 3–4 inches to each side for framing margin. A 10 × 14 inch design needs fabric cut to at least 16 × 20 inches. A fabric calculator handles this for you — enter the stitch count and fabric count, and it tells you exactly how much to cut.
Page references (multi-page patterns)
Large patterns — anything bigger than about 100 × 100 stitches — get split across multiple printed pages. Each page covers a section of the grid, arranged like tiles. Page 1 might cover the top-left corner, page 2 the section to its right, and so on.
Good patterns include:
- A page layout diagram showing which page covers which section (like a map grid: "page 3 = row 2, column 1")
- Overlap markers — a few rows or columns repeated on adjacent pages so you can line them up
- The key on every page, or at least a reference telling you where to find it
If your pattern doesn't have overlap markers, you'll need to carefully match the edge symbols between pages. This is where miscounting happens most — at page boundaries. Take a few extra minutes to verify alignment before committing stitches across a page break. It's much cheaper than frogging.
Types of stitches on a chart
Not every square on the chart represents a full cross stitch. Patterns use different notation for different stitch types, and it's worth knowing what you're looking at before you start.
Full cross stitch (×)
The standard — two diagonal stitches forming an X. Most of the chart will be these. Each symbol filling a complete square means one full X on your fabric.
One thing that makes a real difference to the finished look: keep your top stitches consistent. If the first leg of your X goes bottom-left to top-right, every stitch should go that way. Inconsistent top stitches catch the light differently and make the surface look uneven. It's one of those small details that you can't unsee once someone points it out.
Half stitch (/)
A single diagonal line covering one square. Used for backgrounds, shading, and areas where the designer wants lighter, more transparent coverage. Half stitches use less thread and stitch faster — you'll often see them in sky or water areas of landscape patterns. Patterns with lots of scattered partial stitches are sometimes called confetti — it's worth knowing what you're in for before you start.
Quarter and three-quarter stitches
These cover part of a grid square — a quarter stitch goes from one corner to the center of the square, and a three-quarter stitch combines a half with a quarter. They show up at curved edges and wherever the designer wants smoother lines than full X stitches can manage.
On the chart, quarter stitches usually appear as small triangles in one corner of a square. A square split diagonally between two colors means a three-quarter stitch of one color and a quarter stitch of the other.
These are easier on evenweave and linen (where you can pierce the center of a thread intersection cleanly) and a bit trickier on Aida (where you need to push through the center of a block). If you're new to fractional stitches, try a few on scrap fabric first. There's no wrong way to learn — it's just practice. Tiny Modernist has a visual stitch reference showing how fractional stitches, backstitch, and specialty stitches are charted and worked — useful to keep open alongside your first complex pattern.
Backstitch
Shown as solid or dashed lines running along the edges of grid squares. Backstitch adds outlines, text, fine details, and definition — facial features, whiskers, flower stems, lettering. It's the stitch that makes everything "pop."
Backstitch is always worked after all cross stitches are complete. It typically uses one strand of floss, and the line color on the chart matches the thread color in the key. For a deeper look at the technique, see our backstitch guide.
French knots
Small filled dots on the chart, usually placed at a grid intersection. French knots create raised dots — eyes, flower centers, snow, scattered stars. The key will specify the thread color and sometimes the number of wraps (one wrap for a small knot, two for a larger one).
French knots have a reputation for being fiddly, and honestly, it's deserved. But they get easier with practice, and the texture they add is worth the frustration. The secret most tutorials don't mention: hold the thread taut right up until the needle is almost all the way through. Let go too early and the knot unravels.
Blended threads
Some patterns specify two different thread colors stitched together in the same needle — for instance, one strand of DMC 301 and one strand of DMC 400. This creates subtle color transitions that neither thread could achieve alone. You'll see them in skin tones, gradients, and anywhere the designer wants a color that doesn't exist in the thread range.
Blended stitches are shown in the key as a combined entry (two color codes for one symbol) and on the chart as a single symbol. If you've never tried this, it's easier than it sounds — you just thread two different colors through the needle instead of two strands of the same color. If your pattern uses a lot of blends, a thread conversion chart can help you find substitutes when a specific shade isn't available locally.
Color charts vs symbol charts
Patterns come in different visual formats, and choosing the right one to stitch from makes a bigger difference than you'd expect.
Color charts
Squares are filled with the actual thread colors. You get an immediate visual sense of the finished design — helpful for understanding the big picture and planning which areas to stitch first.
The downside: similar shades become nearly impossible to tell apart. If your pattern has six shades of brown (and portrait patterns often do), a color-only chart will have you squinting and second-guessing constantly. Under artificial light, it gets worse. If you're making your own pattern from a photo, reducing the color count before stitching can make this much more manageable.
Color charts work well for patterns with few, distinct colors — say 8–12 shades that are clearly different from each other.
Symbol charts (black and white)
Each color gets a unique symbol — circles, triangles, squares, letters, shapes. No color at all, just crisp symbols and the key. These are much easier to read when a pattern has many similar shades, and they print cleanly in black and white.
For most actual stitching, symbol charts are the better choice — especially patterns with 15+ colors.
Color + symbol charts
The most useful format combines both — colored squares with a symbol overlaid. You get the visual sense of color placement and the precision of distinct symbols. This is what quality digital patterns provide, and it's the format Stitchmate generates in its pattern PDFs. (Starting from a photo? The best photos guide covers which images convert well and which don't.)
The practical advice: Use the color chart to plan your stitching order and understand the overall design. Switch to the symbol chart (or color + symbol chart) for the actual stitching. If you're printing, print the symbol version — it's sharper and uses less ink.
Reading patterns on paper vs digitally
This is the part that has changed most about cross stitch in the last few years, and very few guides talk about it.
Printed patterns (paper)
The traditional approach. Print the chart, grab a highlighter or colored pencil, and mark off completed rows as you go.
Tips for paper:
- Print at the largest scale your printer handles. A3 if available, or 100% scale rather than "fit to page." Tiny symbols cause mistakes.
- Use a colored pencil instead of a highlighter if you might need to re-read a section. Highlighter obscures symbols permanently. Pencil doesn't.
- Keep a clean copy of the chart and mark up a photocopy.
- A magnetic ruler or line magnifier helps track your position row by row — especially on full coverage charts where every square has a symbol.
- For multi-page patterns, tape adjacent pages together at the overlap sections before you start. This is the single best tip for large paper charts.
Digital patterns (tablet or phone)
More stitchers switch to tablets every year, and the reasons are obvious: zoom into any section, no paper clutter, and your entire pattern stash fits in one device.
The simplest setup: open the PDF in any reader on your tablet (GoodNotes, Adobe Acrobat, Xodo) and use the built-in markup tools to highlight completed sections. Set your screen to stay awake while stitching, and keep the tablet on a stand next to your hoop.
Pattern Keeper takes this further. It's an Android app built specifically for cross stitch PDFs — it lets you highlight all instances of one symbol across the entire chart, tap to mark stitches as complete, and track your progress by color. It removes page breaks entirely, showing the chart as one continuous scroll. Many stitchers say it transformed how they work on large pieces.
Not every PDF works with Pattern Keeper. The app needs to read the symbols in the PDF, which requires them to be embedded as font-based vectors rather than flat images. If you're creating your own patterns, this is worth knowing — patterns made with Stitchmate use font-based vector symbols, so they work with Pattern Keeper out of the box.
What makes a good pattern PDF?
Not all PDFs are created equal. The difference between a well-made chart and a mediocre one becomes obvious about three hours into a project — usually right when it's too late to switch. Here's what to look for.
What you should expect:
- Both a symbol chart and a color chart (or a combined color + symbol chart)
- A complete thread key with brand, code number, color name, and strand count
- Thread usage summary — how many skeins of each color you'll need
- Stitch count dimensions clearly stated
- For multi-page patterns: a page layout diagram showing which page covers which section
Details that make a real difference:
- Grid references (row and column numbers) on every page
- The key printed on every chart page, not just once at the front
- A color preview of the finished design
- Pattern Keeper compatibility (font-based vector symbols)
- Page overlap markers so you can align adjacent pages
Warning signs in lower-quality patterns:
- Symbols too small to read, even at full zoom
- Similar-looking symbols assigned to colors that appear near each other (a dot and a period for two shades of blue — you will mix these up)
- No thread usage estimate, leaving you to guess how many skeins to buy
- Color-only charts with no symbol alternative
- No page numbering or layout diagram on multi-page charts
For a deeper dive into every quality factor — symbol clarity, print sizes, page breaks, and Pattern Keeper compatibility — see our pattern PDF quality guide. If you're evaluating pattern software to create your own charts, our pattern software comparison covers what each tool gets right and wrong on these points.
How to follow a pattern: step by step
- Read everything first. Before threading a needle, read the cover page. Check the thread list, note the stitch count, fabric recommendations, and any special techniques. Five minutes reading saves hours of frogging. If you're more of a visual learner, Fat Quarter Shop has a video tutorial series that walks through these same steps on camera. If you want a sense of the time commitment, plug the stitch count into a time calculator.
- Organize your thread. Sort your floss by color code. Wind each color onto a bobbin or floss drop and label it with both the DMC number and the chart symbol. When you're mid-stitch and need to switch colors, you want to grab the right skein without checking the key every time.
- Prepare your fabric. Cut it 3–4 inches larger than the finished design on all sides. Find the center by folding in half both ways. Consider gridding — marking 10×10 lines with a washable pen or basting thread — especially for patterns larger than about 100 × 100 stitches. It's tedious prep work, but most experienced stitchers will tell you it's the best investment of time you can make. Studio Koekoek has a good visual guide to marking up your fabric if you haven't tried gridding before.
- Start from the center. Match the center of your fabric to the center arrows on the chart. Pick a section near the center with a large block of one color — this gives you an anchor point to count from and a satisfying chunk of progress early on.
- Work systematically. Most stitchers work one color at a time across a section, completing all stitches of that color before moving to the next. Others prefer to work section by section, finishing a 10×10 block completely before moving on. Either approach works — the key is consistency so you don't lose your place. There's no wrong method here, just whichever keeps you oriented.
- Cross stitches first, then backstitch. Complete all full, half, and fractional stitches before adding backstitch outlines. Backstitch goes on last because it sits on top of the cross stitches and defines edges between color areas.
- Track your progress. Mark completed sections on a printed chart with a colored pencil, or highlight them digitally on your tablet. Check your work against the chart regularly — after every 10×10 block is a good rhythm. Catching a miscount after 20 stitches is a minor inconvenience; catching it after 200 is genuinely heartbreaking.
Common mistakes (and how to avoid them)
These aren't beginner-only problems. Even experienced stitchers run into these, and there's no shame in it.
Miscounting across page breaks. The single biggest source of errors on large patterns. When you move from one page to the next, count backwards from a known reference point to confirm alignment. Don't assume the pages line up — verify. This is worth its own rule: never trust a page boundary without checking.
Stitching from the wrong chart version. If your pattern includes both a color chart and a symbol chart as separate pages, it's surprisingly easy to grab a page from the wrong version when you have 12 sheets spread across a table. Some stitchers print their symbol pages and color pages on different colored paper to avoid this.
Ignoring the strand count. Defaulting to two strands everywhere when the pattern calls for three strands on 11-count, or one strand for backstitch. The difference in coverage and appearance is significant — it's worth double-checking before you stitch a whole section.
Skipping the thread usage estimate. Running out of a color halfway through a project means buying more and hoping the dye lot matches (DMC is generally consistent, but "generally" is a stressful word when you're 80 hours into a piece). Check the estimate before you start and buy an extra skein of any color used heavily.
Starting from a corner. Corners feel like natural starting points, but they risk the entire design ending up off-center on your fabric. Always start from the center. It takes a bit of counting to find your first stitch, but that five minutes prevents a much worse problem.
FAQ
How do I read a cross stitch chart?
What do the symbols mean in a cross stitch pattern?
Should I start stitching from the middle?
What is the difference between a color chart and a symbol chart?
How do I read a multi-page cross stitch pattern?
What does "Pattern Keeper compatible" mean?
How many strands of floss should I use?
Can I use the same pattern on Aida and evenweave?
Further reading
- Stitched Modern — How to read a cross stitch pattern — clean, visual summary of chart elements with good examples of how symbols and keys work together
- Fat Quarter Shop — How to read a cross stitch pattern — video tutorial series walking through chart reading, fabric counts, and finished sizes step by step
- Caterpillar Cross Stitch — How to read a cross stitch pattern — beginner-friendly walkthrough with practical tips on workspace setup and progress tracking
- Crewel Ghoul — How to read a cross stitch pattern — concise guide with clear explanations of color charts vs symbol charts
- Studio Koekoek — How to read a cross stitch pattern — includes a helpful section on marking your fabric grid and using transparent covers to protect paper charts
Ready to try reading a real pattern?
Upload any photo and get a full cross stitch chart — with grid, key, and symbols — in about 30 seconds.
Create a patternFree to use. No account required.
Related Guides & Tools
Backstitch in cross stitch
How to read backstitch on charts, how many strands to use, and when to skip it entirely.

What is Aida count?
How fabric count affects stitch size, finished dimensions, and which count works best for your pattern.
Cross stitch fabric types
Aida, evenweave, or linen? Compare fabric types by count, stitch coverage, and finished look.

How to convert a photo to a cross stitch pattern
Step-by-step guide to turning any photo into a stitchable pattern — including fabric and size recommendations.
What makes a good pattern PDF?
Symbol clarity, print sizes, page breaks, Pattern Keeper compatibility, and a quality checklist for evaluating any chart.
How to fix cross stitch mistakes
When miscounting happens despite your best efforts — frogging, unpicking, and when to stitch over an error.